Car AC Recharge: Cost, DIY Guide, and When You Need It
A professional car AC recharge costs $150-$300 at an independent shop, which includes evacuating old refrigerant, leak testing, and refilling the system by weight with a certified recovery machine. A DIY recharge kit from AutoZone or Walmart costs $30-$50 and takes about 15 minutes — but if your AC needs refrigerant, there's a leak somewhere. Refrigerant doesn't evaporate, burn off, or get "used up." It circulates in a sealed loop until a seal fails or a component corrodes through.
That distinction — between topping off a slow seep and masking a real leak — is the difference between $35 and $1,200. This article covers the actual costs, a step-by-step DIY guide, which refrigerant your car uses, and how to tell when a $30 can of R-134a is a reasonable fix versus an expensive way to delay the inevitable.
How Much Does a Car AC Recharge Cost?
A shop AC recharge runs $150-$300 at an independent mechanic, or $200-$400 at a dealership. RepairPal's 2026 national average lands at $266-$348, which includes recovery of the old refrigerant, a basic leak check, and a measured refill. A DIY recharge kit costs $30-$50 for R-134a vehicles, or $60-$100 per can for newer R-1234yf vehicles.
A professional AC recharge costs $150-$300 at an independent shop (RepairPal 2026 average: $266-$348). DIY R-134a kits cost $30-$50 at AutoZone or Walmart. R-1234yf kits for 2017+ vehicles cost $60-$100 per can. If the system has a leak, a DIY recharge lasts weeks to months before the AC blows warm again — the real repair costs $200-$1,200+ depending on the failed component.
The price gap between DIY and shop isn't just labor. A shop evacuates the system with a recovery machine (required by EPA Section 608 — venting refrigerant is illegal, with fines up to $49,689 per day), measures the exact charge by weight, and checks for leaks with UV dye or an electronic sniffer. A DIY kit adds refrigerant by pressure gauge only, which is less precise and can't detect leaks.
| Service | Cost | What's Included |
|---|---|---|
| DIY R-134a kit (AutoZone, Walmart) | $30-$50 | One 12oz can with gauge and hose. No leak detection. |
| DIY R-1234yf kit | $60-$100 per can | One 8oz can with gauge. Different port fitting than R-134a. |
| Independent shop recharge | $150-$300 | Evacuate, leak test, refill by weight, performance check |
| Dealership recharge | $200-$400 | Same as above, OEM refrigerant, higher labor rate |
| Diagnostic with UV dye test | $80-$150 | UV dye injection, black-light inspection to pinpoint leak source |
| Full leak repair + recharge | $200-$1,200+ | Depends on component: O-rings, condenser, compressor, or evaporator |
Prices reflect 2026 national averages. Vehicles using R-1234yf cost more at shops due to higher refrigerant prices.
R-134a vs. R-1234yf: Why Your Refrigerant Type Matters for Cost
Your vehicle's refrigerant type determines what you'll pay — and whether a DIY recharge is even practical. R-134a, used in vehicles from 1994 to roughly 2016-2020, costs $13-$22 per 12oz can at retail. R-1234yf, the replacement mandated by the EU since 2017 and adopted by all U.S. automakers by 2025, costs $50-$90 per 8oz can — roughly 8-10x more per pound.
The price difference exists because R-1234yf has a Global Warming Potential (GWP) of 4, compared to R-134a's GWP of 1,430. It's a mildly flammable synthetic refrigerant (classified A2L) that required billions in retooling across the auto industry. The EPA's AIM Act phases down R-134a production — 60% of baseline by 2024, 30% by 2029 — which will push R-134a prices up over time too.
Check the label under your hood — it states the refrigerant type and system capacity in ounces. During the 2014–2020 transition, the same model and year could use either refrigerant depending on production date and assembly plant, so the underhood label is the only reliable source.
| Refrigerant | Vehicles | Retail Cost (per can) | GWP | DIY Feasible? |
|---|---|---|---|---|
| R-134a | 1994-~2020 | $13-$22 (12oz) | 1,430 | Yes — kits widely available |
| R-1234yf | ~2017-present | $50-$90 (8oz) | 4 | Possible but expensive; requires different fitting |
| R-12 (Freon) | Pre-1994 | $50-$100+ per lb | 10,900 | No — requires EPA Section 609 certification to purchase |
Why Your AC Loses Refrigerant
A car's AC system is a sealed loop: compressor, condenser, expansion valve, evaporator, connected by aluminum lines and rubber hoses with O-ring seals at every joint. Refrigerant circulates through this loop indefinitely. It doesn't burn off, and it doesn't need periodic top-ups the way oil or coolant does.
Refrigerant doesn't wear out or get consumed. If your AC blows warm, the system has a leak. A slow loss of 1-2 oz per year through microscopic seal permeability is normal — about half an ounce per year is typical on well-maintained systems. But losing enough refrigerant to affect cooling means a seal, hose, or component has failed and needs repair.
The four most common leak points, in order of frequency:
-
O-ring seals at line connections — Rubber O-rings harden and crack with age and heat cycling. Most AC systems have 8-12 O-rings. Replacement cost: $150-$500 depending on location (some are accessible in minutes; others require removing the dashboard).
-
Condenser — Sits in front of the radiator, exposed to road debris. A rock chip can puncture the thin aluminum fins. Replacement cost: $380-$1,360 including refrigerant and labor (Kelley Blue Book, 2026).
-
Compressor shaft seal — The only moving seal in the system. Fails more often on vehicles driven infrequently, because the seal dries out without the lubricating oil film that circulates with the refrigerant. Compressor replacement cost: $1,100-$2,500 (J.D. Power, 2026).
-
Evaporator — Buried inside the dashboard, where condensation promotes corrosion over 8-15 years. Replacement cost: $750-$1,300 because the dashboard must come out (ConsumerAffairs, 2026).
Running the AC for 10-15 minutes every few weeks — even in winter — circulates oil through the compressor seal and keeps O-rings lubricated. This one habit can add years to the compressor's life. AAA recommends this as part of routine vehicle care, and you can log it as part of your seasonal maintenance checklist.
DIY AC Recharge: Step-by-Step
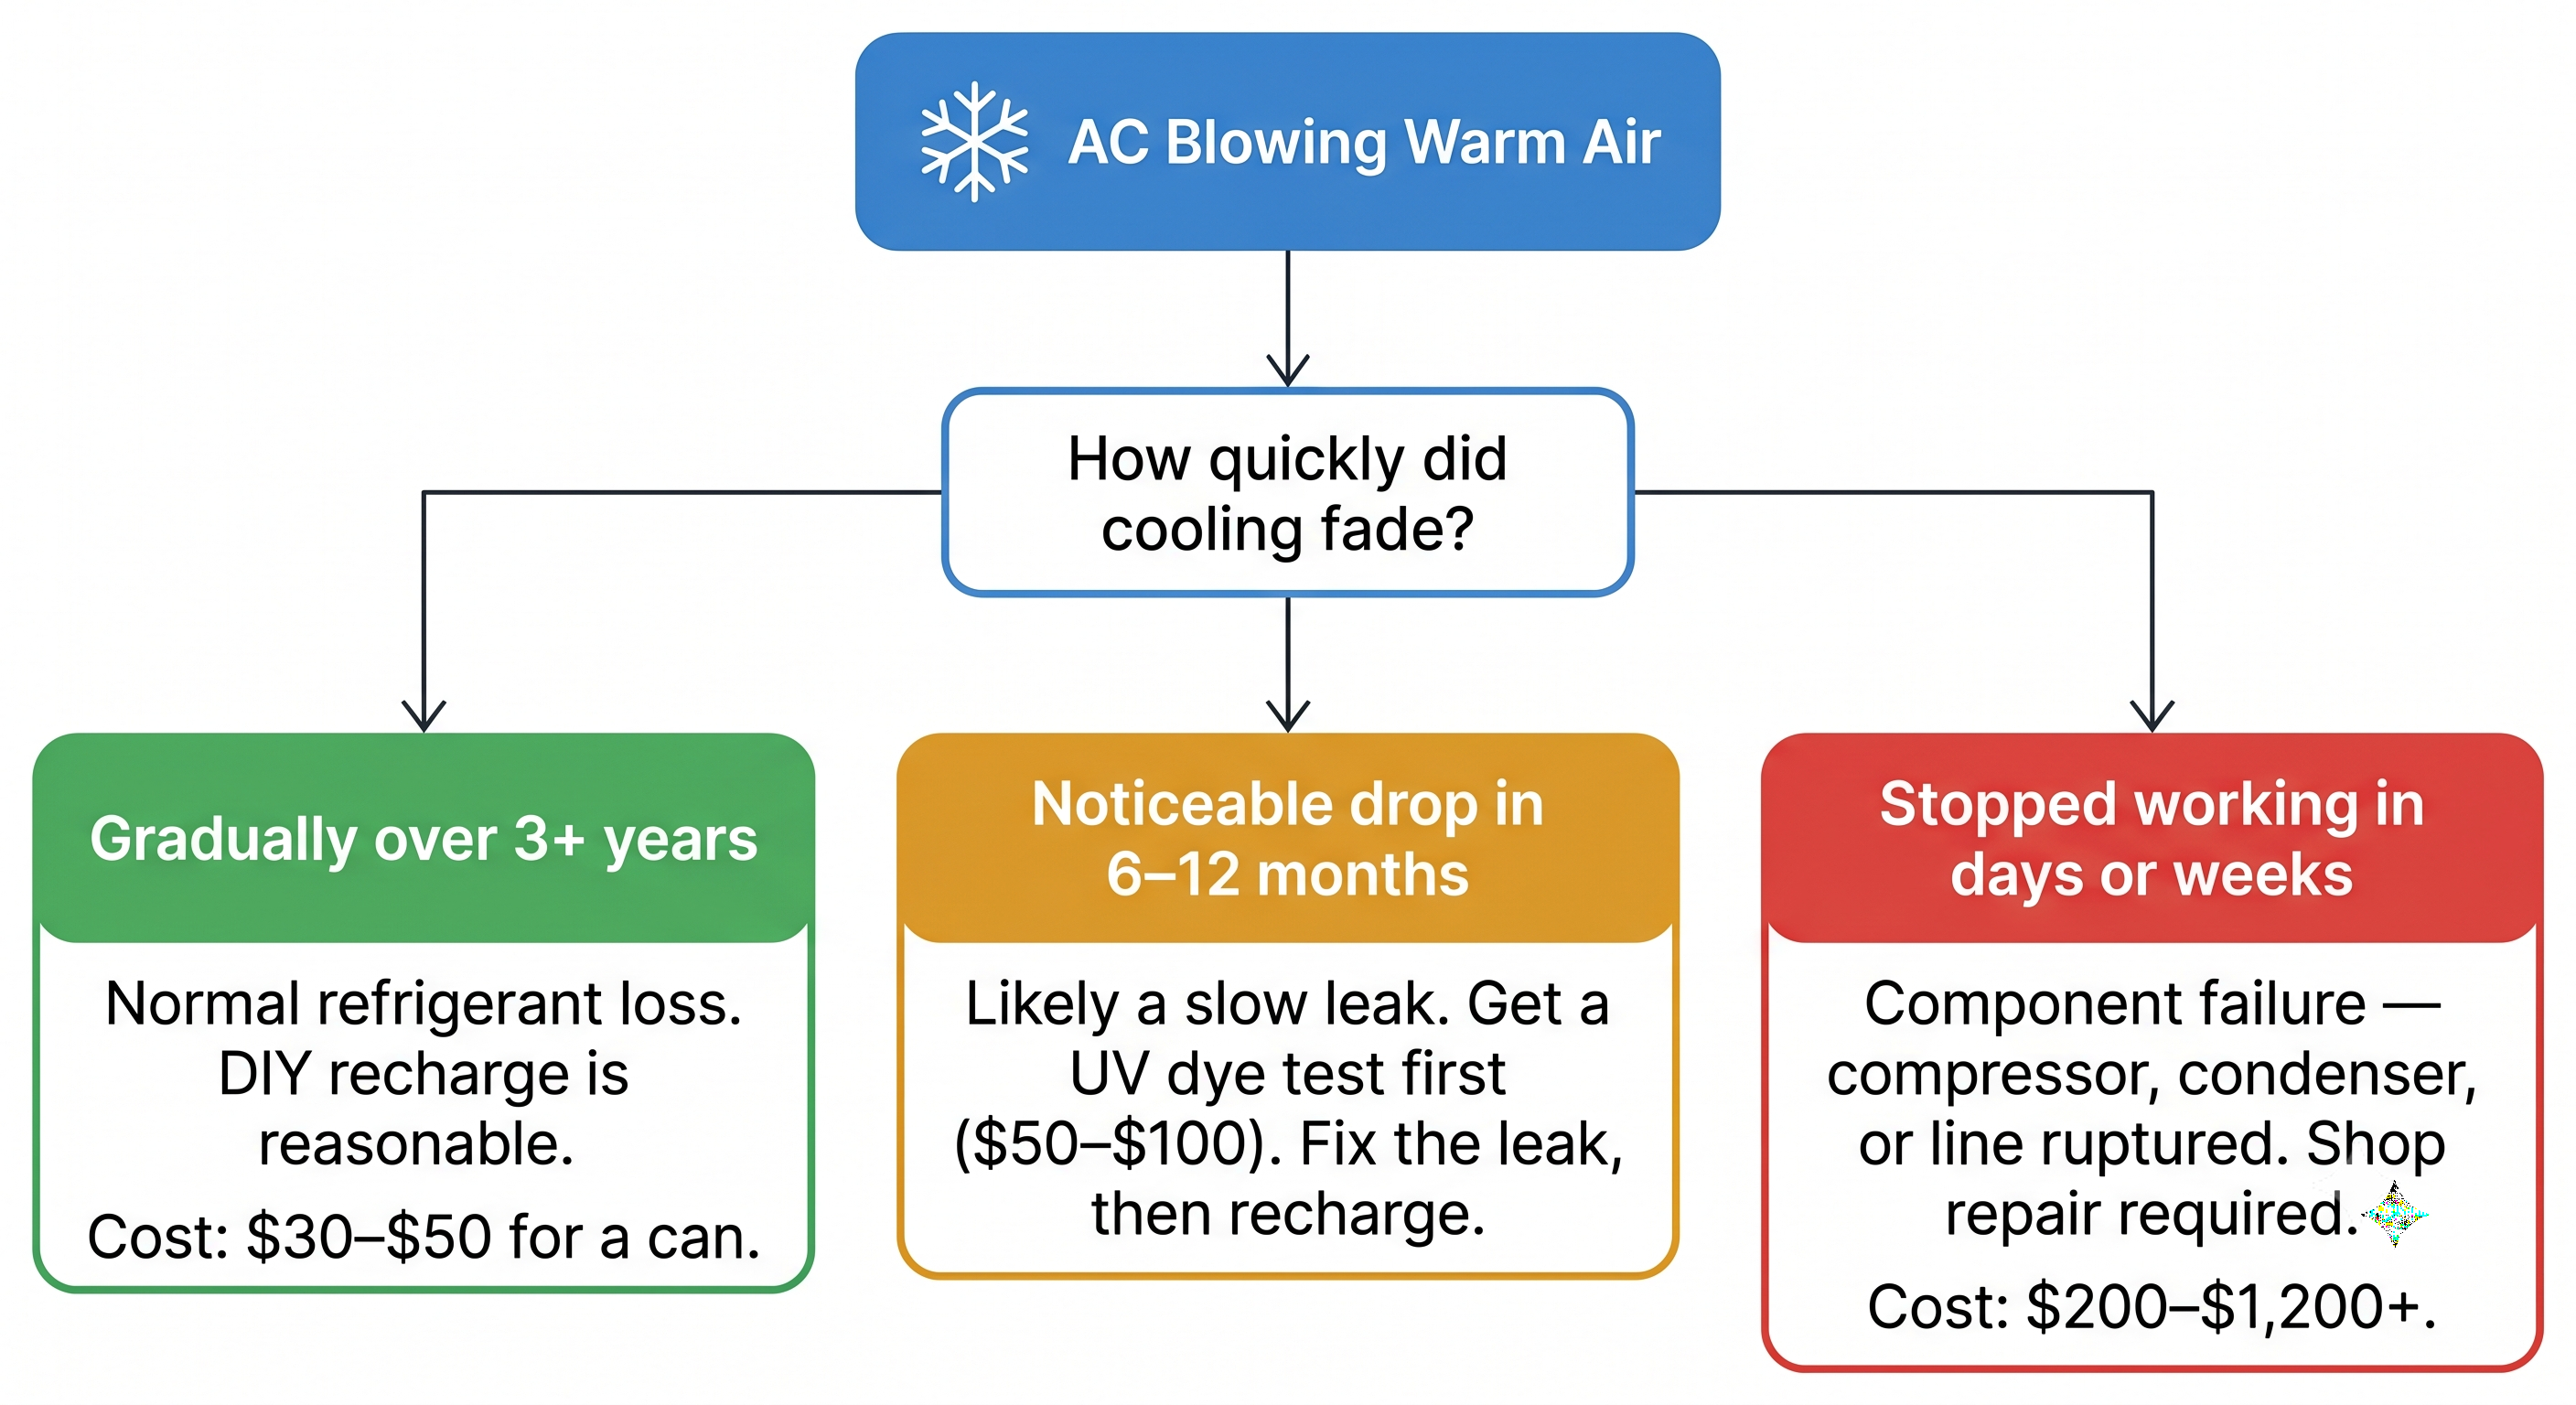
A DIY recharge makes sense in one scenario: your AC gradually lost cooling over several years, and you want to restore it for the cost of a single can of refrigerant. If the AC went from cold to warm in days or weeks, skip the $35 kit and go straight to a shop for leak diagnosis — you'll save money in the long run.
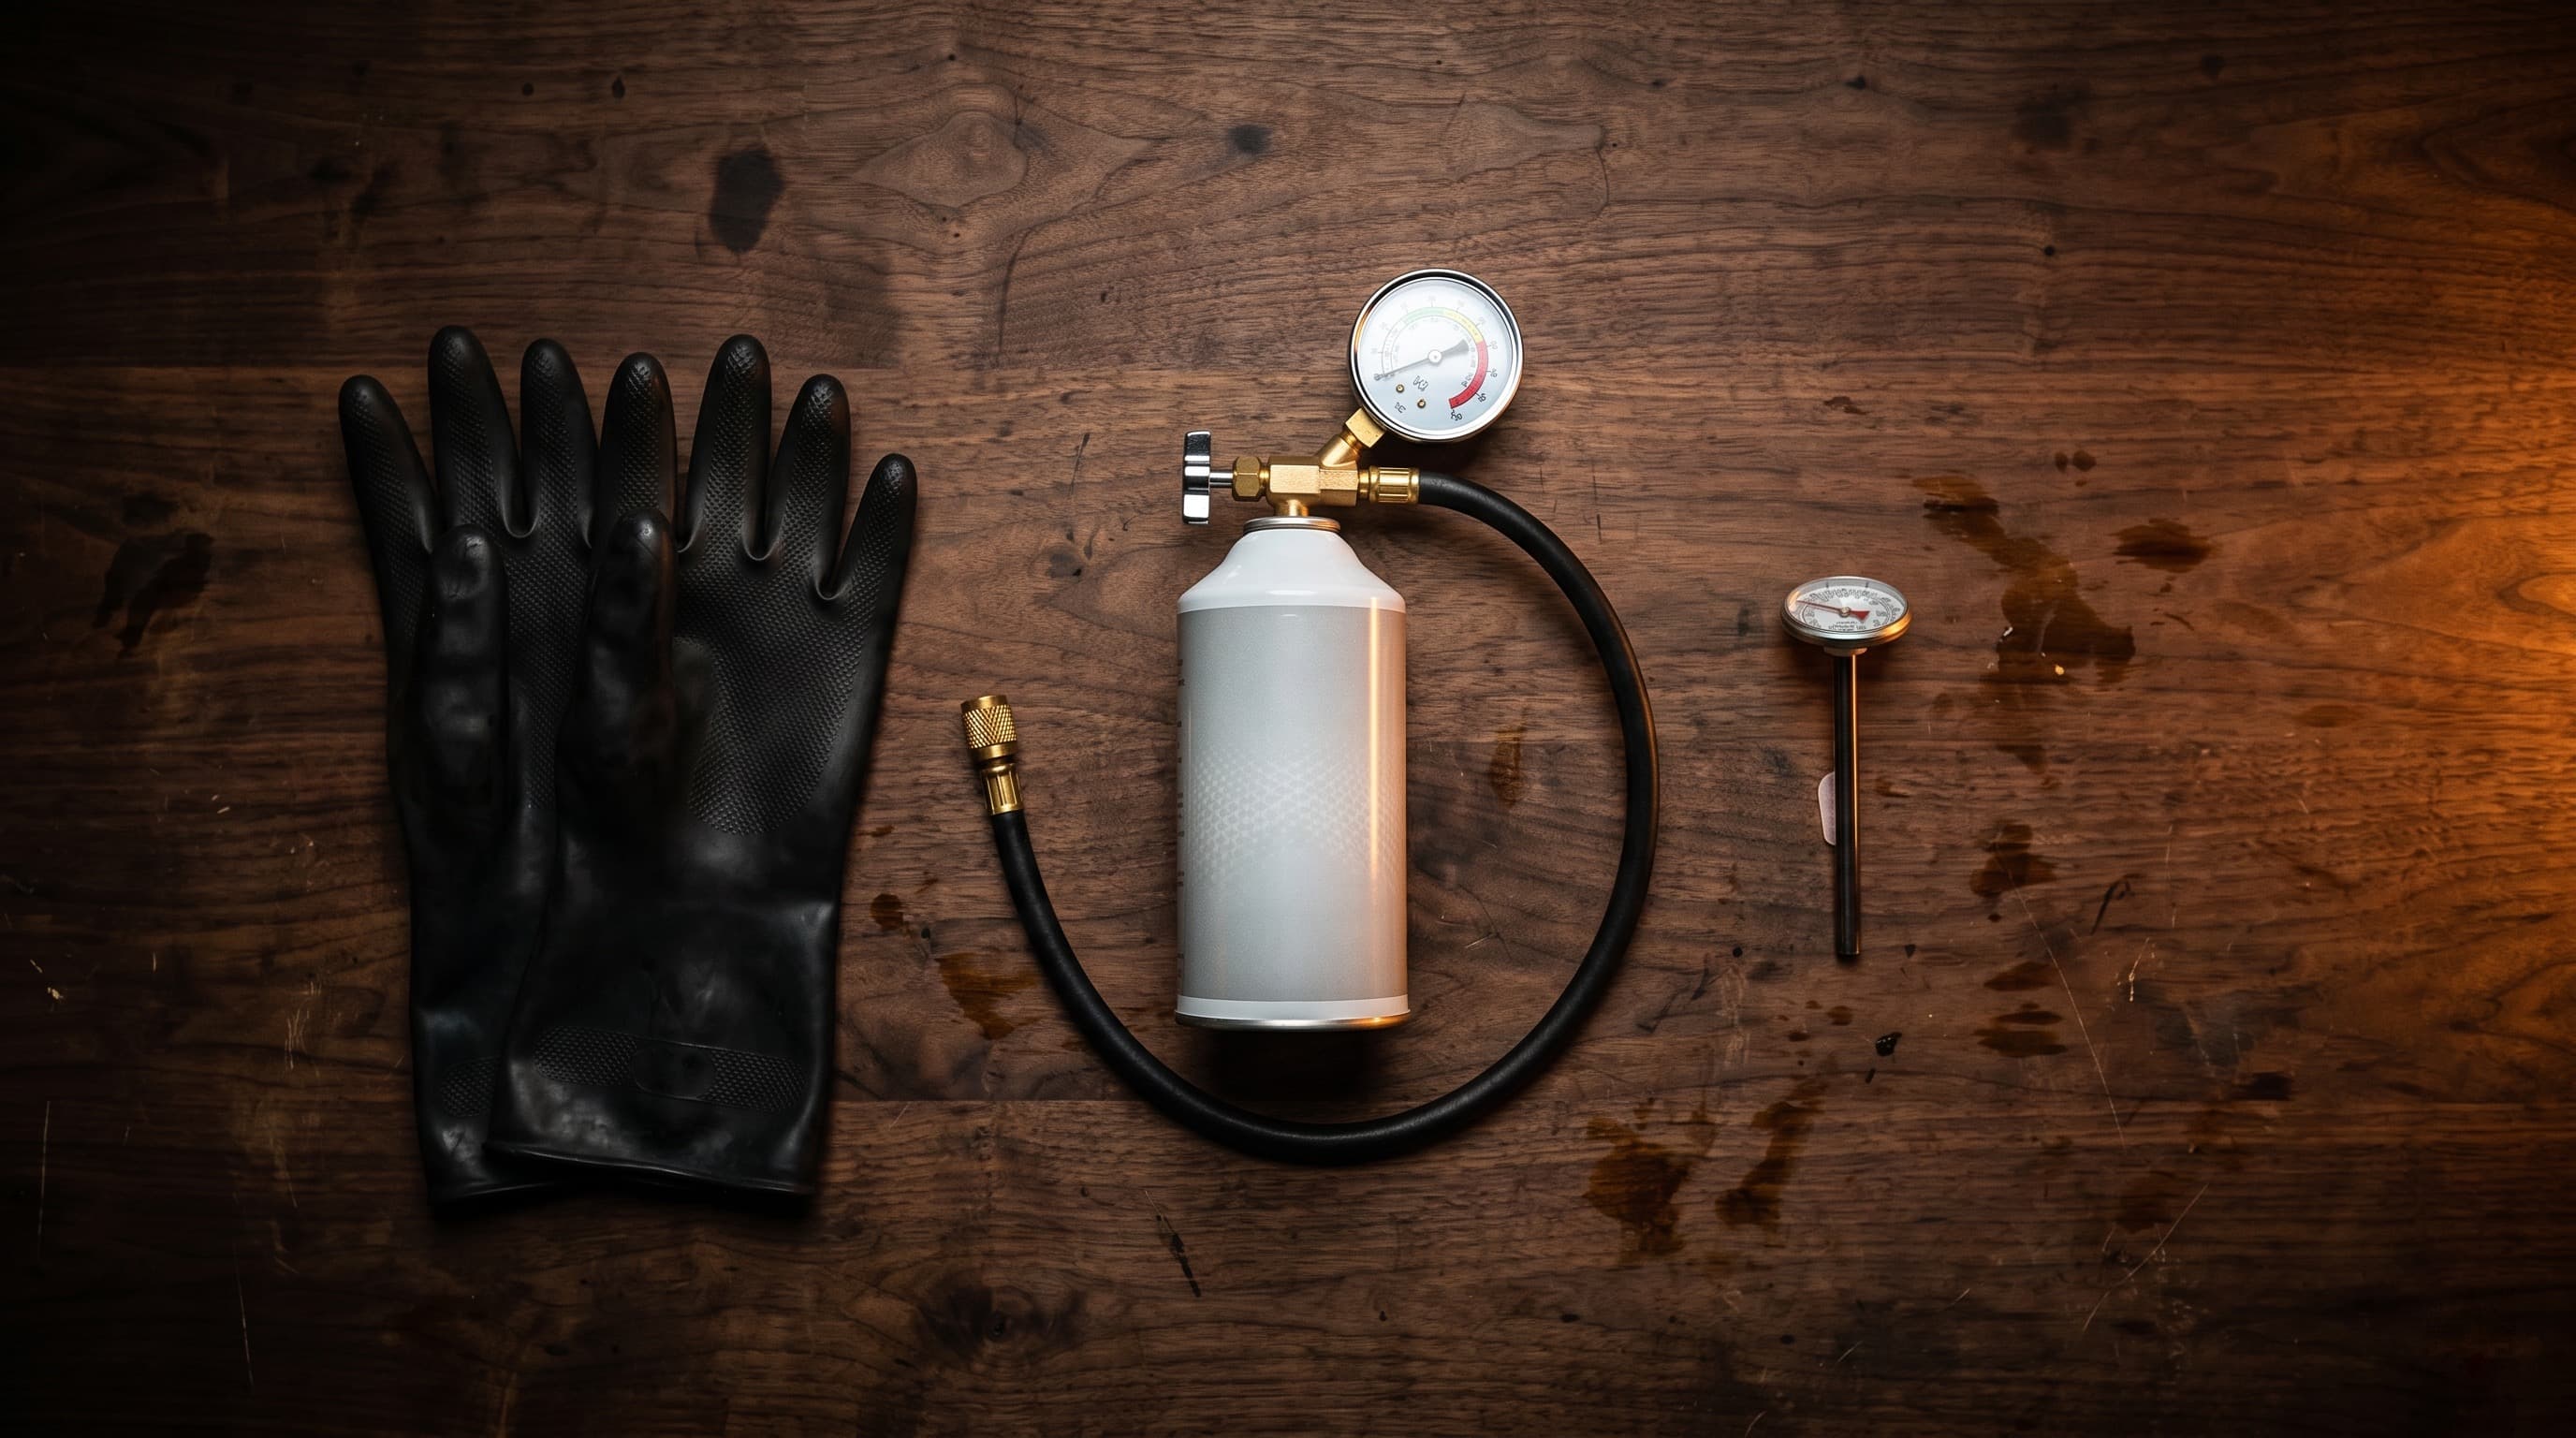
What You Need
- R-134a recharge kit with gauge and hose ($30-$50) — brands like AC Pro, Interdynamics, or ZeroR all work
- Meat thermometer or infrared thermometer
- Safety glasses and gloves — refrigerant causes frostbite on skin contact
- The underhood label showing your refrigerant type and system capacity
Step-by-Step Process
1. Confirm your refrigerant type. The underhood label or driver's door jamb sticker specifies R-134a or R-1234yf. If it says R-1234yf, a standard R-134a kit won't fit — the service port fittings are intentionally different sizes. If it says R-12 (pre-1994 vehicles), do not attempt a DIY recharge; R-12 requires EPA Section 609 certification to purchase.
2. Find the low-pressure service port. Follow the AC lines from the compressor. The low-pressure port sits on the larger-diameter suction line, usually between the compressor and the firewall. It has a small plastic cap marked "L." The high-pressure port cap physically cannot accept a consumer recharge hose — the fittings are different diameters as a built-in safety measure.
3. Start the engine and turn AC to max cold, max fan. Listen for the compressor clutch to engage — a click followed by the center hub of the compressor pulley spinning. If the clutch won't engage, the system may be too low on refrigerant for the low-pressure switch to close the circuit. Some recharge kits include a jumper to temporarily bypass the switch, but this is a strong signal you need professional diagnosis.
4. Attach the hose and read the baseline pressure. Connect the recharge hose's quick-connect fitting to the low-pressure port. Note the gauge reading before adding anything. At 80°F ambient, a properly charged system reads 25-45 psi on the low side. Below 20 psi, the system has lost a significant amount of refrigerant.
5. Add refrigerant in short bursts. Hold the can upright (liquid refrigerant should not enter the suction line). Squeeze the trigger in 3-5 second bursts, shaking the can between each one. Watch the gauge — the pressure rises slowly. Stop when the needle enters the green zone for your ambient temperature. A typical system holds 20-32 oz total; you're adding 12oz from one can. Overcharging damages the compressor by sending liquid refrigerant into cylinders designed for gas.
6. Check the vent temperature. Stick a thermometer in the center dashboard vent. A properly charged system at 80°F ambient should blow 38-45°F air. If the vent temperature stalls above 50°F despite the gauge reading correctly, the system has a problem beyond low refrigerant — a stuck expansion valve, failing compressor, or clogged condenser.
Three Mistakes That Damage Your AC
Overcharging. The most common DIY error. Too much refrigerant raises system pressure, forcing the compressor to work against excessive resistance. Over months, this kills the compressor — and a compressor replacement costs $1,100-$2,500. If the gauge passes the green zone, you cannot remove refrigerant with a DIY kit. A shop with a recovery machine has to evacuate and recharge from scratch.
Using stop-leak additives. Some recharge kits include sealant marketed as "stop leak." These products circulate through the system and can clog the expansion valve or orifice tube — a $200-$400 repair. Most shops refuse to work on systems contaminated with stop-leak sealant because it damages their recovery equipment. A contaminated system may need a full flush ($300-$600) before any repair can begin.
Mixing refrigerant types. R-134a and R-1234yf are not compatible. Mixing them creates unpredictable pressures, degrades the compressor oil, and contaminates the system. The entire charge must be recovered and the system flushed — $300-$500 before any actual repair starts.
When to Skip DIY and Get a Professional Diagnosis
A UV dye test at a shop costs $80-$150 and pinpoints exactly where refrigerant is escaping. The mechanic injects UV-reactive dye into the system, runs it for a few days, then inspects every joint, line, and component with a black light. Glowing green traces reveal the leak's location.
Skip the DIY kit and go straight to a shop if: the AC went from cold to warm in under a month, the compressor clutch won't engage, you hear grinding or squealing from the compressor, or you've already recharged within the past year. A UV dye test costs $80-$150 and identifies the exact leak — which saves you from pouring $30-$50 cans of refrigerant into a system that leaks it back out.
Signs you need a repair, not a recharge:
- AC lost cooling in days or weeks — a rapid leak, often a condenser puncture or blown hose
- Compressor clutch won't engage — could indicate a seized compressor ($1,100-$2,500 to replace) or a failed pressure switch ($50-$150)
- Grinding or clicking from the compressor — internal bearing failure, requires compressor replacement
- Oily residue on AC line fittings — refrigerant oil leaks alongside the refrigerant, leaving a visible film
- You've recharged within the past 12 months — the leak is fast enough that topping off is just throwing money away
- Musty smell from the vents — not a refrigerant issue; this is mold on the evaporator, which requires an evaporator cleaning or replacement
AC Repair Cost Breakdown by Component
When a shop diagnoses a leak, the repair cost depends entirely on which component failed. Here's what each repair runs, with labor included:
| Component | Parts Cost | Labor Cost | Total Installed | Failure Frequency |
|---|---|---|---|---|
| O-ring seals | $5-$40 (set) | $100-$450 | $150-$500 | Most common — age and heat cycling |
| Condenser | $150-$500 | $200-$500 | $380-$1,360 | Common — road debris damage |
| Compressor | $350-$800 | $400-$700 | $1,100-$2,500 | Moderate — shaft seal and bearing wear |
| Evaporator | $200-$500 | $500-$900 | $750-$1,300 | Less common — internal corrosion over 8-15 yrs |
| Expansion valve | $50-$150 | $150-$300 | $200-$450 | Uncommon — sticking or clogging |
| Pressure switch | $30-$80 | $50-$100 | $80-$180 | Uncommon — electrical failure |
Cost ranges reflect 2026 national averages from Kelley Blue Book, J.D. Power, and ConsumerAffairs. Vehicles using R-1234yf add $30-$80 in refrigerant costs to any repair that requires evacuation and recharge.
Any repair that opens the AC system also requires a full evacuation, vacuum test, and recharge — add $150-$300 to the component cost if not already included. A reputable shop will also replace the receiver/drier or accumulator ($50-$180) during major repairs, because the desiccant inside absorbs moisture when the system is open.
Pinion's service log lets you track what you've spent on AC repairs over time, which helps you decide whether to keep fixing a 12-year-old system or accept that the evaporator is next.
R-134a Phase-Out: What It Means for Your Car
The EPA's AIM Act is phasing down R-134a production: 60% of baseline levels in 2024, dropping to 30% by 2029 and an 85% reduction by 2036. Starting January 1, 2028, new vehicles cannot use R-134a. By January 1, 2031, new R-134a-containing equipment cannot be sold at all.
For cars already on the road, R-134a will remain available for servicing — but expect prices to climb as production shrinks. The transition from R-12 (Freon) to R-134a in the 1990s followed the same pattern: R-12 went from $5/lb in 1990 to $50-$100+/lb by 2010 as supplies dwindled.
If you drive a 2015 or older vehicle, the AC system could easily need service during the years when R-134a gets expensive. Converting an R-134a system to R-1234yf is technically possible but rarely cost-effective — it requires new O-rings, a compatible compressor oil, and a system flush, totaling $500-$1,000+ at a shop. For most owners, stocking up on a couple of R-134a cans at today's prices ($13-$22 each) and using them as needed makes more financial sense than retrofitting.
The Real Decision: Recharge or Repair?
The question isn't really "how do I recharge my AC?" — it's "should I recharge my AC, or fix the leak?"
If your AC gradually weakened over 3-5 years, a $30-$50 DIY recharge is reasonable — you're compensating for normal seal permeability. If the AC lost cooling in under a year, a UV dye test ($80-$150) will identify the leaking component. Repeated recharges without fixing the leak wastes refrigerant (illegal to vent under EPA Section 608) and delays an inevitable repair that only gets more expensive as adjacent components fail.
A practical decision framework:
- AC weakened gradually over 3+ years: DIY recharge is a reasonable first step. Monitor how long it lasts. If it holds for another 2+ years, the system has slow seal permeability — normal for older vehicles.
- AC weakened over 6-12 months: Get a UV dye test. The leak is fast enough that a $30 recharge won't last the summer. You'll spend more on repeated kits than on finding and fixing the leak.
- AC died in days or weeks: Something ruptured — a hose, condenser, or compressor seal. A recharge will leak out almost immediately. Get it towed if the compressor is making noise.
- AC works but smells bad: Not a refrigerant issue. The evaporator has mold growth. An evaporator cleaning spray ($10-$15) or cabin air filter replacement ($15-$30) often solves it. Replacing the cabin air filter is a 5-minute job you can do yourself.
Track your AC recharge dates and costs in Pinion so you have data to make this call — one recharge in five years is maintenance, two in one year is a leak.
FAQs
How much does a car AC recharge cost?
A professional AC recharge costs $150-$300 at an independent shop, which includes evacuating the old refrigerant, leak testing, and refilling with the correct amount by weight. RepairPal's 2026 national average is $266-$348. A DIY recharge kit costs $30-$50 for R-134a vehicles. If the system has a leak, a DIY recharge lasts weeks to months before the AC blows warm again — the underlying leak repair costs $200-$1,200 depending on the component.
How often does car AC need to be recharged?
A properly sealed AC system should never need a recharge. Refrigerant doesn't wear out or get consumed — it circulates in a sealed loop. A slow loss of about half an ounce per year through microscopic seal permeability is normal, but losing enough to affect cooling within a few years indicates a failing O-ring, condenser, compressor seal, or evaporator. If you find yourself recharging more than once every 3-5 years, get a leak diagnosis.
Can I recharge my car AC myself?
Yes, DIY recharge kits with R-134a refrigerant work for vehicles made between 1994 and roughly 2020. Connect the can to the low-pressure port on the larger AC line near the firewall, start the car with AC on max, and add refrigerant until the gauge reads in the green zone for your ambient temperature. Do not overcharge — too much refrigerant damages the compressor. Vehicles from 2017+ may use R-1234yf, which costs $50-$90 per can and requires a different service port fitting.
What is the difference between AC recharge and AC repair?
A recharge adds refrigerant to the system — appropriate when the system has lost a small amount through normal seal permeability over several years. An AC repair fixes the underlying leak: replacing O-rings ($150-$500), a condenser ($380-$1,360), a compressor ($1,100-$2,500), or an evaporator ($750-$1,300). If your AC loses cooling within a few months of a recharge, you need a repair, not another recharge. A $80-$150 UV dye test identifies the exact leak location.
Frequently Asked Questions
Vlad Kuzin
Developer of Pinion. Writes about car maintenance to help people save money and stay safe on the road.
